You will get to learn,
- Creating your first form in Google
- Publish your form and get replies
Create your first form in Google Forms
Under this topic:
- Create a form
- Add questions
- Customize your design
- Control and monitor access
- Review your form
- Report abusive content in a form
Create a form

- Go to forms.google.com.
- Click Blank form
 .
. - Name your untitled form.

Add questions

If you're using a template, you can skip to Update questions.
- Open a form in Google Forms.
- Click Add
 .
. - To the right of the question title, choose the type of question you want.
- Type the possible responses to your question. To prevent people from not answering, turn on Required.

Update or arrange questions
- To move a question, at the top of a question, click Drag
 .
. - To add a description to a question, click More

 Description.
 - To add an image to a question, click Add image
 .
. - To add a YouTube video to a question, click Add video
 .
. - To delete a question, click Delete
 .
.
Tip: To preview your changes at any time, at the top right, click Preview ![]() .
.
Customize your design

Use an theme with your organization's branding
- In Google Forms, open a form.
- Click Customize theme
 .
. - Under "Themes," click a theme.
Note: Organization-branded themes appear only if your administrator makes them available.
Create sections
Sections can make your form easier to read and complete. Each section starts on a new page.
- In Google Forms, open a form.
- Click Add Section
 .
. - Name the new section.
Tips:
- To move questions into a section, at the top of a question, click Drag
 .
. - To reorder sections, at the top of a section, click More

 Move section.
Change the color or header
Change the font
- In Google Forms, open a form.
- Click Customize theme
 .
. - Below "Text," you can change the font style for headers, questions, and text. Choose the text style you want to edit, then change the font and size.
- Click Close
 .
.
Control and monitor access

Allow access from outside your organization
By default, access is restricted to people inside your organization. People must sign in with their email address to access your form.
To share a form with people outside your organization:
- Open a form in Google Forms.
- At the top of the form, click Settings.
- Next to “Responses,” click the Down arrow
 .
. - Turn off Restrict to users in [your-company.com] and its trusted organizations.
Collect email addresses of participants
Record the email addresses from people who fill out your form. When someone takes your survey, they will be required to enter their email address before they submit the form.
Collect verified emails
Important: Respondents must confirm their Google Account email address gets collected with their response. The confirmation displays on each page of the form.
- Open a form in Google Forms.
- At the top, click Settings.
- Next to “Responses,” click the Down arrow
 .
. - Under "Collect email addresses," select Verified.
Collect emails manually
- Open a form in Google Forms.
- At the top, click Settings.
- Next to “Responses,” click the Down arrow
 .
. - Under "Collect email addresses," select Responder input.

Review your form

Preview it yourself
At any time, you can preview your form to see what the changes look like.
- At the top right, click Preview
 .The preview opens in a new window.
 - To edit the form, click Edit
 or go back to your editing window.
Send it to collaborators for review

Before sending your form, you can let people review and edit it. Whoever you invite can edit any part of your form, including responses and where they are saved.
- Open a form in Google Forms.
- In the top right, click More
 .
. - Click Add collaborators.
- Click "Invite people."
- In the "Add editors" window, add email addresses to share it with others.
- Click Send.
Report abusive content in a form

You can report abusive content in a form from your computer.
- To report a violation in a form, you can:
- At the bottom left, Help
 Report.
 - At the bottom, click Report.
- If you're an editor, click More

 Report.
- At the bottom left, Help
- Choose the type of abuse found in the form.
- Click Submit Abuse Report.
Publish your form and get responses
On this page:
- Publish your form
- Get form responses
Publish your form

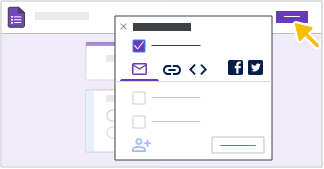
Before responders can access your form, you need to publish it. When your form is ready to share, you can share it through email, social media, or embed on a website or blog.
- At the top right, click Publish.
- To select who can respond to the form, click Manage.
- To give responder access to the users, add them to your form.
- Click Share.
- Optional: To notify the responders, click Notify these responders.
- You can also include a message.
- Click Publish or Publish and notify.
- Optional: Under “General access,” you can give access to anyone with a link or to target audiences.
- Click Done
 Publish.
- Once your form is published, at the top right, it shows “Published.”
- To change publishing options, click Published.
Share your form with responders
- Open a form in Google Forms.
- To share your form with responders, click Share
 .
. - Optional: Under “General access,” you can give access to anyone with a link or target audiences.
- Enter the names of the people or groups.
- To select the level of access, next to the responder names, click Down arrow

 Responder.
- Optional: To select a date to remove access to the form:
- Click Add expiration.
- In the calendar, select a date.
- Click Done.
- Optional: To remove expiration, click Edit expiration

 Remove expiration.
- Optional: To select a date to remove access to the form:
- If the form is published, an email notification will be shared when you send the form.
- Optional: For published forms, you can add a message to your email notification.
- Optional: If you don’t want to send a notification, uncheck the box next to “Notify People.”
- Click Send.
Email your form
To automatically send the form in an email notification when you share a form, click the box next to “Notify People.” If you notify responders when you publish the form, the email sent to them includes the form.
Tip: You can’t embed a form in an email when it contains:
- File upload question
- Rating question
- Image in a question or an option
- Secured quiz
Share a link to your form
To get the form link for responders, you can either:
- At the top right, click Preview
 Copy responder link.
 - Once you publish the form, click Published
 Copy responder link.
 - At the top right, click Share
 Copy responder link.
Tip: You can copy a short link once you publish the form:
- Click the box next to “Shorten URL.”
- Click Copy.
Add a form to a website or blog
To embed a form on a website or blog:
- Open a form in Google Forms.
- At the top right, click More menu
 .
. - Select Embed HTML
 .
. - To copy the HTML that shows, click Copy.
- Paste the HTML into your website or blog.
Get form responses

Open the Responses tab

Send responses to a spreadsheet
- Open a form in Google Forms.
- At the top, click Responses
 Summary.
 - At the top right, click More

 Select destination for responses.
 - Select an option:
- Create a new spreadsheet:Creates a spreadsheet for responses in Google Sheets.
- When you use your Google Forms data to create a new sheet, Google Sheets automatically puts your data in a table, bringing format and structure to your data.
- Select existing spreadsheet: To store responses, select from your existing spreadsheets in Google Sheets.
- Create a new spreadsheet:Creates a spreadsheet for responses in Google Sheets.
- Click Create or Select.

Stop collecting responses
When you create a new form, response collection is automatically turned on. You can pause or stop it. For example, if you find a mistake after sending out a form, you can pause response collection until the error is fixed.
- Open a form in Google Forms.
- At the top right, click Published.
- Turn Accepting responses from On to Off.
- Click Save.
After you've turned this off, you'll see a message in the "Responses" tab that says "This form isn't accepting responses."

Was this article helpful?
That’s Great!
Thank you for your feedback
Sorry! We couldn't be helpful
Thank you for your feedback
Feedback sent
We appreciate your effort and will try to fix the article