On this page, you'll learn this:
- Create your first presentation with slides
- Share a presentation
Create your first presentation with slides
This part:
- Create or import a presentation
- Add slides to your presentation
- Update your presentation
- Generate a new slide with Gemini
Create or import a presentation

Create your presentation
- Open the Slides home screen at Google Slides.
- In the top left, under "Start a new presentation," click New
 . This will create and open your new presentation.
Import and convert an existing presentation
Converting your file from another program creates a copy of your original file in a Docs, Sheets, or Slides format. You can then edit the file in your browser.
If you have existing files, you can import and convert them to Docs, Sheets, or Slides.
- Go to Drive.
- Click New
 File Upload.
 - Choose the file you want to import from your computer to add it to Drive.
- In the Upload complete window, click Show file location
 .
. - Right-click the file and select Open with
 Google Docs/Sheets/Slides.
Add slides to your presentation

Add a slide with the same layout as the current slide
- On your computer, open a presentation in Google Slides.
- In the top left, click New slide
 .
.
Add a slide with a different layout
- On your computer, open a presentation in Google Slides.
- At the top left, click New slide with layout
 .
. - Choose a slide.
 .
.Add a slide with your organization's branding
On your computer, open a presentation in Google Slides.
- In the top left, click Templates
 .
. - At right, click the template you want to use.
Update your presentation

Choose a theme and layout
When you first create a presentation, you can choose a theme for your slides. A theme is a preset group of colors, fonts, background, and layouts. Your presentation's layout is the way your text and images are arranged on a slide.
Change your presentation's theme
- On your computer, open a presentation in Google Slides.
- At the top, click Slide
 Change theme.
 - On the right, click the theme you want.
Change the layout of your presentation
- On your computer, open a presentation in Google Slides.
- Select a slide.
- At the top, click Layout.
- Choose the layout you want to use.

Arrange slides
Move slide—Drag the slide to a different position in the presentation. To move several slides at once, Ctrl+click multiple slides before dragging them.
Delete slide—Right-click the slide and select Delete.
Duplicate slide—Right-click the slide in the sidebar and select Duplicate slide.
Add pictures, text, speaker notes, and more
Rename your presentation—Click Untitled presentation and enter a new name.
Add images—Click Insert![]() Image to add images from your computer, the web, Google Drive, and more. You can also move, delete, or resize images.
Image to add images from your computer, the web, Google Drive, and more. You can also move, delete, or resize images.
Add text—Click Insert![]() Text box to add new text boxes. Then, click a text box to enter text. You can move, delete, or re-size text boxes. You can also change how text fits in a box.
Text box to add new text boxes. Then, click a text box to enter text. You can move, delete, or re-size text boxes. You can also change how text fits in a box.
Add videos, shapes, charts, and more—Click Insert to add videos, shapes, charts, slide numbers, and other features to your presentation. You can also move, delete, or re-size these inserted features.
Add speaker notes—Use speaker notes to keep track of your talking points for each slide. In the presentation editor, speaker notes appear beneath the current slide. When you present your slides, your speaker notes show in a separate window.

Generate a new slide with Gemini
Generate a new slide with Gemini
You can use the Gemini in Slides side panel to generate a new slide.
- On your computer, open Google Slides. New slides are generated using your current theme.
- At the top, click Ask Gemini
 .
. - In the side panel, select a prompt or create your own. To create a prompt with the name of your file, insert @ before the name. For example, Create a slide about how to optimally train for a marathon or Create a slide about @Company 2023 Goals deck.
- From the generated slide, you can:
- Get a different version: From the menu, click Retry
 .
. - Add the slide to your presentation: From the menu, click Insert
 .
. - Refine the generated slide: From the menu, click Close
 . On the side panel, write a new prompt.
 - Send feedback: From the menu, click Good Suggestion
 or Bad suggestion
  .
.
Share a presentation
This part:
- Present your slides
- Share a presentation
- Unshare a presentation
- Comment on a presentation
- Chat with collaborators in a presentation
Present your slides

To present a full-screen presentation in Google Slides:
- Open a presentation in Google Slides.
- In the top right, click Slideshow
 . For best results, present with Google Chrome.
 - From the current slide, the presentation will become full screen. To change slides, use the arrow keys on your keyboard or click the arrows at the bottom of the presentation.
- To exit full-screen, press the Esc key.
View a presentation with speaker notes
- Open a presentation in Google Slides.
- In the top right corner, next to Slideshow
 , click the Down arrow
  .
. - Click Presenter view.
- Click Speaker notes.
Do other actions while you're presenting
When you present, you can choose more options from the toolbar at the bottom of the presentation window:
- Select slides to present from a list
- Open "Presenter" view
- Turn on laser pointer
- Print the presentation
- Download the presentation in PDF or PPTX format
Share a presentation
- On your computer, go to Google Drive.
- Select the file you want to share
 Share
Share  .
. - Enter the email address you want to share with. If you use a work or school account, you can share with suggested recipients.
- Tip: To turn off suggested recipients, go to your Drive Settings
 . Uncheck "Show suggested recipients in the sharing dialog."
- Tip: To turn off suggested recipients, go to your Drive Settings
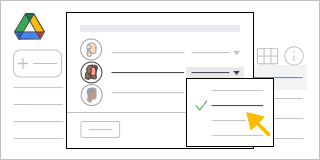
- Decide how people can use your file. Select one:
- Viewer
- Commenter
- Editor
- If you use an eligible work or school account, click Add expiration to add an expiration date.
- When you share your file, each email address gets an email.
- Optional: Add a message to your notification email.
- If you don't want to notify people, uncheck the box.
- Click Send or Share.

Share a link to a presentation
You can choose if your file should be available to anyone or restricted to only the people with access. If you allow access to anyone with the link, your folder won't restrict who can access it.
- Select the file you want to share.
- Click Share or Share
 .
. - Under “General access”, click the Down arrow
 .
. - Choose who can access the file.
Tip: If you use your Google account for work or school, you can choose to only share files and folders with a specific audience, like your department. You might find a description of each audience when you hover over the group name.
- To decide what role people will have with your file, select Viewer, Commenter, or Editor.
- Click Done.
Unshare a presentation

Stop sharing a presentation you own
- Find the file or folder in Google Drive, Google Docs, Google Sheets, or Google Slides.
- Open or select the file or folder.
- Click Share or Share
 .
. - Find the person you want to stop sharing with.
- To the right of their name, click the Down arrow

 Remove access.
 - Click Save.
Remove a link to a presentation you own
- Find the file or folder in Google Drive, Google Docs, Google Sheets, or Google Slides.
- Open or select the file or folder.
- Click Share
 or Share
 Copy link
  .
. - Under “General access”, click the Down arrow
 .
. - Select Restricted.
- Click Done.
Comment on a presentation

- On your computer, open a document, spreadsheet, presentation, or video.
- Highlight the text, images, cells, slides, or scenes you want to comment on.
- To add a comment, in the toolbar, click Add comment
 .
. - Type your comment.
- Click Comment.

Chat with collaborators in a presentation

- On your computer, open a document, spreadsheet, or presentation.
- At the top right, click Show chat
 . This feature won't be available if you're the only one in the file.
- Tip: If there are many collaborators in the file, at the top right, to the right of the avatars, there will be a blue circle showing the number of additional collaborators. Click the blue circle
 Join chat
  .
.
- Tip: If there are many collaborators in the file, at the top right, to the right of the avatars, there will be a blue circle showing the number of additional collaborators. Click the blue circle
- Enter your message in the chat box.
- When you’re finished, at the top right of the chat window, click Close
 .
.
Note: All chats in Google Docs, Sheets, and Slides include anyone viewing the file. The chats aren't saved.

Was this article helpful?
That’s Great!
Thank you for your feedback
Sorry! We couldn't be helpful
Thank you for your feedback
Feedback sent
We appreciate your effort and will try to fix the article